PROPER INSTALLATION OF STORM WINDOWS
 Timing and Sequencing
Any repair of the window sash, window frame, or sill is easier to do before a storm is installed (for more on window repair, see our repair page). The same is true for painting.
Mothballing Deteriorated Windows
However, repair and painting are not necessary before a storm window is
installed. That work may add more time and expense than is available. In
fact, installing a storm window over deteriorated sash, frames, and
sills provides excellent protection for them until a future time, when
there is adequate time and money to make repairs and restoration. The
storm window essentially "mothballs" the windows. Such a situation can
remain in place for many years. With a storm in place, repairs and
painting can be done one or a few windows at a time, rather than all at
once.
Proper Installation
Always carefully follow the manufacturer's instructions for installing storm windows.
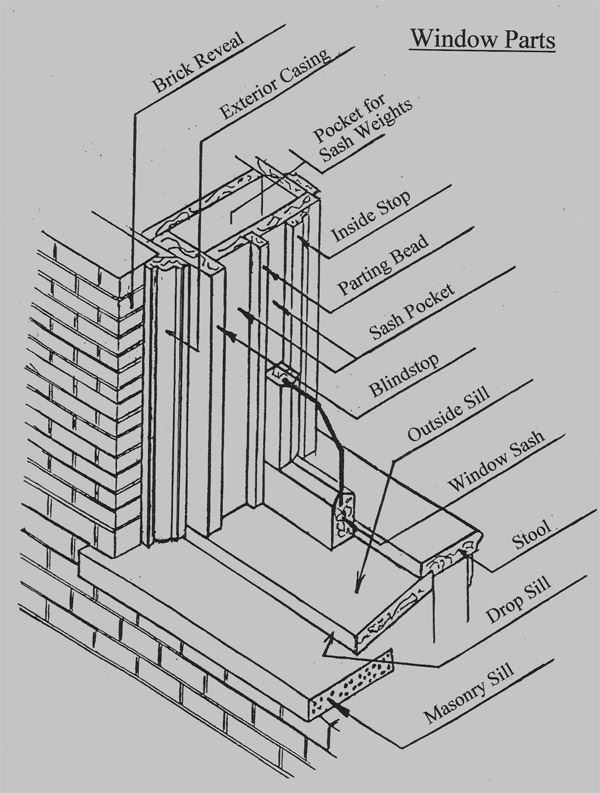
Exterior storm windows generally mount on the blindstop, next to the exterior casing, and rest on the outside sill, which may be masonry or wood (see diagram.) The surfaces onto which a storm window is mounted are together called the "storm bed."
Much of the preparation for mounting storm windows requires fairly low-level skills. A homeowner who can do them will save money. A painting contractor also might do this prep work more carefully than an installer.
General Installation Guidelines:
Much of the preparation for mounting storm windows requires fairly low-level skills. A homeowner who can do them will save money. A painting contractor also might do this prep work more carefully than an installer.
- Storm bed should be smooth and clean. This may require scraping away paint build up or old caulking.
- Repair any deteriorated wood in the storm bed.
- Casing and blind stop must be securely fastened to the house.
- If there is any unpainted wood, prime it and apply two coats of house paint to match the exterior casing.
-
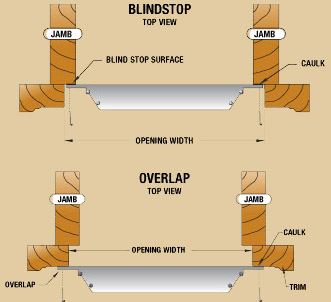
 Make all measurements for width at top, center, and bottom. This will show if the window frame is square. For height, measure at right, center, and left. Storms should be measured to fill the entire storm bed. Follow manufacturer's instructions for minimum clearances, which usually are 1/16" along the sides and top.
- If windows do not have a blindstop, then storms must be mounted on the window casing or brick molding.
- For this overlap mounting, the measurements are different. Storms must extend over the casings enough to provide a firm basis for mounting.
- Where blindstops exist, overlap mounting is not recommended, because it covers and obscures the decorative dimensions of the casing.
- For the best appearance, the storms and the sash should be the same color. Raw mill aluminum is paintable. Most storm manufacturers offer many colors or even custom colors.
- Mount in three steps.
- First, center the storm window in the opening. Ensure that all screw holes land on solid wood.
- Second, after removing the storm, lay a generous bed of caulk all around the sides and top of the storm bed. Do not caulk the bottom edge along the sill (see below.) Use a long-lived (and paintable) caulk. A complete and tight seal is essential for storms to cut air infiltration.
- Third, fasten the frame of the storm window to the storm bed per manufacturer's instructions.
- Push the top of the storm snuggly into the very top of the opening. Temporarily fasten the top corners.
- Use screws not nails.
- Manufacturers generally advise that the storm window glass panels be installed before completely fastening the storm frame. This is a guide to keeping the storm frame square. Then the panels will not have gaps from the frame. And they will operate smoothly.
- Adjust the expander on the bottom of the storm window.
Typical aluminum storm windows will come with a window sill expander, which allows the bottom of the storm window to expand (around ½ inch) to meet the angled sill of the window opening. Tap down the adjustable expander tight against the windowsill. The expander should make even contact across the bottom sill.
- The bottom edge of the storm window should have weep holes at the sill to allow moisture to escape. Be sure these are not plugged by paint or caulk. If a storm does not have weep holes, create 2-3 along the bottom edge of the expander.
"The most common mistake people make is to caulk the storm's bottom edge, along the windowsill," he says. That can trap water that leaks in or condenses on the inside of the glass. "You want to give water a chance to escape before it causes any damage." Tom Silva, This Old House.
- Interior caulking between the storm and the blindstop (or casing) of the window adds more protection against air infiltration. This is possible to do only if the window sash are operable. If they are not, then if the window sash ever are removed in the future for repair or restoration, there is an opportunity to caulk. Again, weep holes (or even the entire bottom edge of the storm) must be left open.
Bob Vila demonstrates installation of an exterior 2-3 track aluminum storm window: (VIDEO)
Interior Storm WindowsMany different designs of interior storm windows are available. They mount in a variety of different ways. Follow manufacturer's directions.
General Installation Guidelines
- The goal is to have a tight seal of the storm window or panel with the window frame to eliminate any air leaks.
- If the interior storm has a framework, it should seal tightly with the window frame.
- If the storm has a removable panel, it should seal tightly into the frame.

